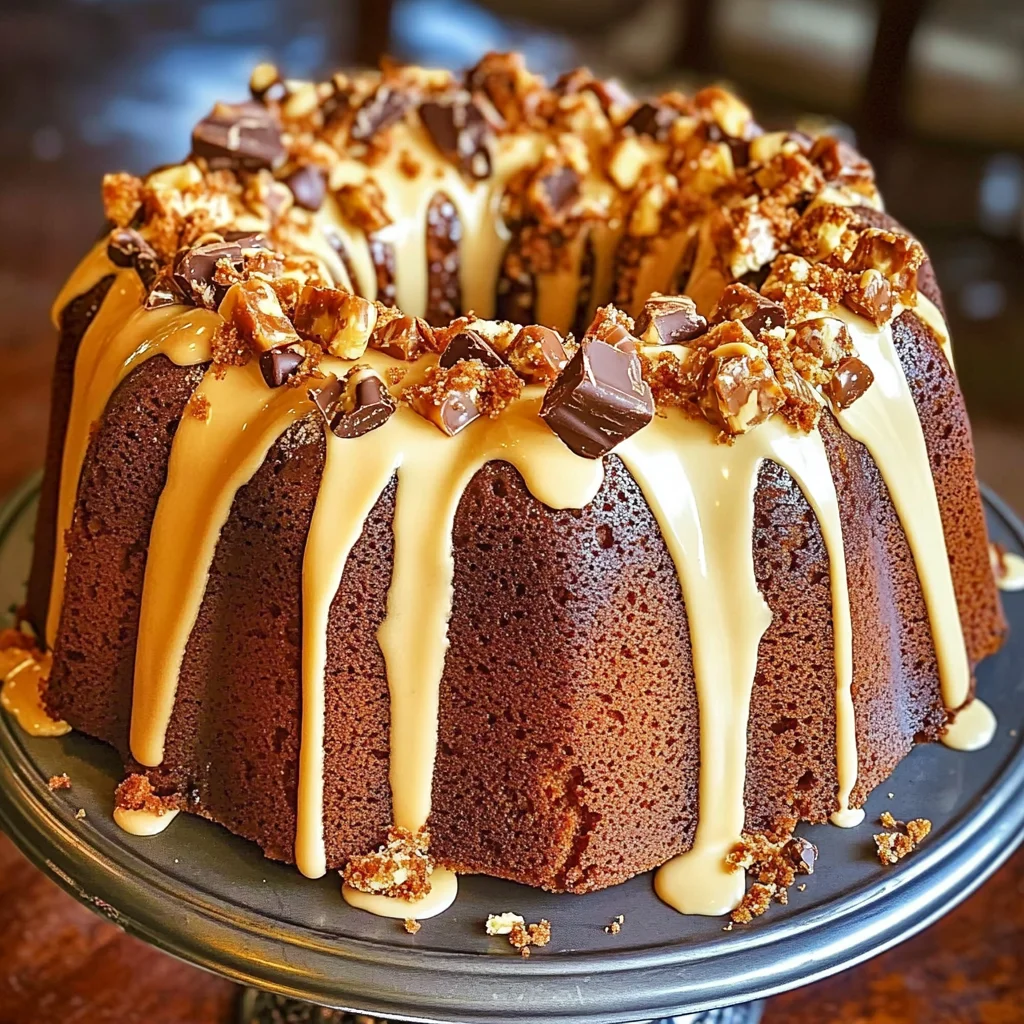
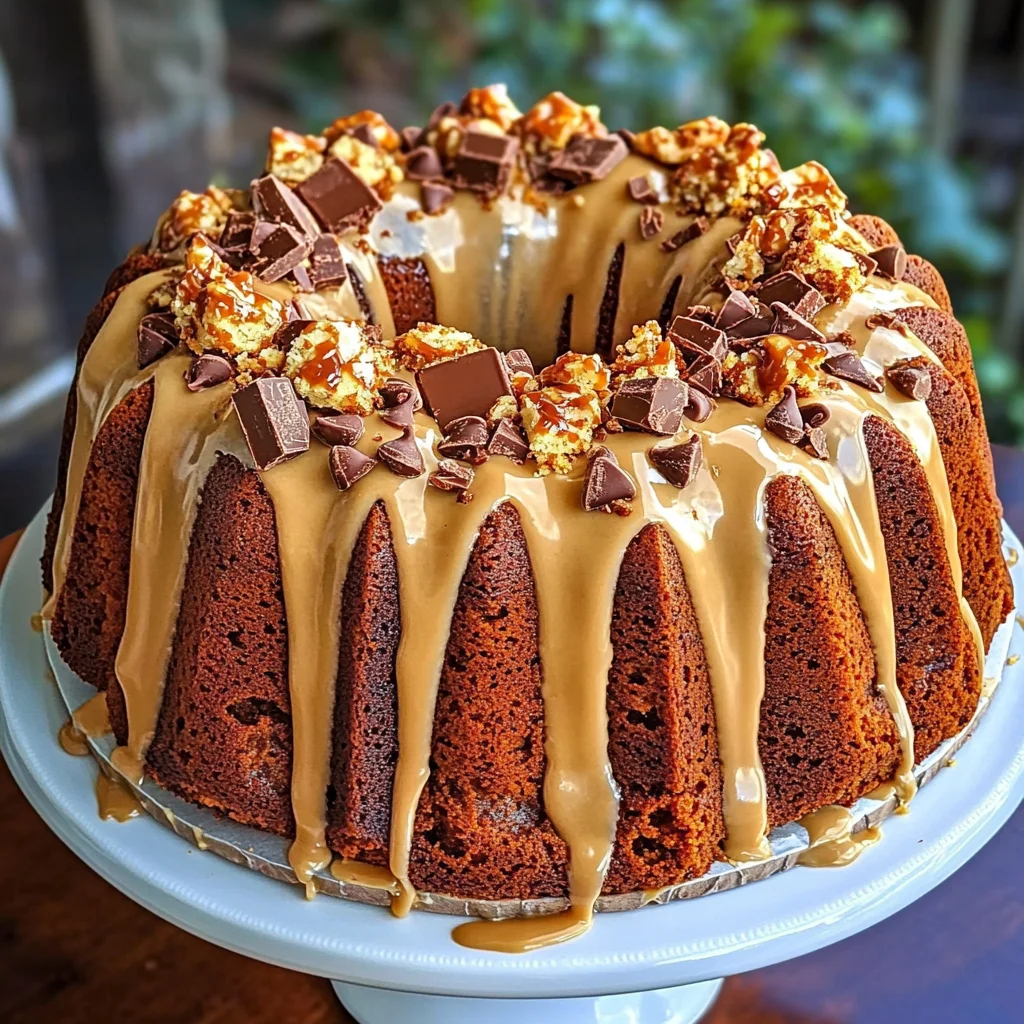
Butterfinger Bundt Cake
Butterfinger Bundt Cake is a delightful treat that combines rich flavors and a moist texture, making it perfect for any occasion. Whether you’re celebrating a birthday, hosting a gathering, or simply indulging in a sweet craving, this cake stands out with its delicious layers of Butterfinger candy and creamy peanut butter glaze. It’s not just a dessert; it’s an experience that will leave your guests asking for seconds!
Why You’ll Love This Recipe
- Easy to Make: With straightforward steps, this recipe is beginner-friendly and requires no specialized skills.
- Decadent Flavor: The combination of Butterfinger bars and peanut butter creates a rich taste that chocolate lovers will adore.
- Versatile Dessert: Suitable for special occasions or casual get-togethers, this cake fits perfectly into any setting.
- Fun Presentation: The bundt shape and playful toppings make it visually appealing, adding charm to your dessert table.
- Leftover Friendly: This cake stays fresh for days, making it great for sharing or enjoying throughout the week.
Tools and Preparation
Before diving into the recipe, ensure you have the necessary tools ready. Using the right equipment can make your baking experience smoother and more enjoyable.
Essential Tools and Equipment
- Bundt pan
- Mixing bowls
- Whisk
- Electric mixer (optional)
- Measuring cups and spoons
- Rubber spatula
Importance of Each Tool
- Bundt pan: The unique shape of the bundt pan allows for even baking and creates an impressive presentation.
- Electric mixer: While you can mix by hand, an electric mixer saves time and ensures that ingredients are thoroughly combined.
- Measuring cups and spoons: Accurate measurements are crucial in baking to achieve the perfect texture and flavor.
Ingredients
For the Cake:
- 3 cups all-purpose flour
- 2 cups granulated sugar
- 1 cup unsalted butter, softened
- 1 cup sour cream
- 4 large eggs
- 1 cup whole milk
- 2 tsp vanilla extract
- 1 tsp baking powder
- 1 tsp baking soda
- 1 tsp salt
- 1 cup chopped Butterfinger candy bars
For the Peanut Butter Glaze:
- 1 cup powdered sugar
- 3 tbsp creamy peanut butter
- 2-3 tbsp milk (adjust for consistency)
- 1 tsp vanilla extract
For Garnish:
- Additional chopped Butterfinger bars
- Chocolate chips (optional)
- Crushed graham or cookie crumbs (optional)
How to Make Butterfinger Bundt Cake
Step 1: Preheat the Oven
Preheat your oven to 350°F (175°C). Grease and flour a 10-12 cup bundt pan to prevent sticking.
Step 2: Prepare the Cake Batter
- In a large mixing bowl, cream together the unsalted butter and granulated sugar until light and fluffy.
- Beat in the eggs one at a time. Then add in the vanilla extract and sour cream.
- In a separate bowl, whisk together all-purpose flour, baking powder, baking soda, and salt.
- Gradually add the dry ingredients to the wet mixture while alternating with whole milk until just combined.
- Gently fold in the chopped Butterfinger candy bars.
Step 3: Bake the Cake
Pour the batter into the prepared bundt pan. Bake for 50-55 minutes or until a toothpick inserted into the center comes out clean. Allow the cake to cool in the pan for about 15 minutes before transferring it onto a wire rack to cool completely.
Step 4: Make the Glaze
In a medium bowl, whisk together powdered sugar, creamy peanut butter, milk, and vanilla extract until smooth. Adjust milk as needed to achieve your desired consistency.
Step 5: Assemble and Garnish
Once cooled, drizzle the peanut butter glaze over your bundt cake. Sprinkle with additional chopped Butterfinger bars, chocolate chips, or crushed cookie crumbs for added texture and decoration.
Serve slightly warm or at room temperature—this Butterfinger Bundt Cake pairs wonderfully with a glass of cold milk or scoops of vanilla ice cream!
How to Serve Butterfinger Bundt Cake
Serving Butterfinger Bundt Cake is as delightful as making it. This rich and moist cake can be enjoyed in various ways that enhance its sweet and nutty flavors.
With Cold Milk
- A classic pairing, cold milk balances the sweetness of the cake and complements its texture.
A Scoop of Vanilla Ice Cream
- Adding vanilla ice cream creates a creamy contrast to the warm cake, making each bite indulgent.
Topped with Whipped Cream
- Light and airy whipped cream adds a fluffy element that pairs wonderfully with the dense cake.
Garnished with Fresh Fruit
- Fresh berries or banana slices provide a refreshing contrast to the sweetness of the Butterfinger Bundt Cake.
Drizzled with Chocolate Sauce
- For chocolate lovers, a drizzle of chocolate sauce enhances the dessert’s richness and adds visual appeal.
Served at Room Temperature
- Allowing the cake to sit at room temperature brings out its flavors while maintaining its moist texture.
How to Perfect Butterfinger Bundt Cake
Perfecting your Butterfinger Bundt Cake ensures every bite is delicious. Here are some helpful tips:
-
Use Room Temperature Ingredients: Ensure butter, eggs, and sour cream are at room temperature for better mixing and texture.
-
Don’t Overmix: Mix until just combined to prevent a dense cake. Overmixing can lead to tough results.
-
Adjust Baking Time: Keep an eye on your cake during baking. Oven temperatures can vary, so check for doneness a few minutes early.
-
Cool Before Glazing: Let the cake cool completely before adding the glaze for a beautiful finish that won’t melt away.
-
Store Properly: Keep leftovers in an airtight container at room temperature for up to 3 days for optimal freshness.
-
Experiment with Garnishes: Try different toppings like chopped nuts or shredded coconut for added texture and flavor.
Best Side Dishes for Butterfinger Bundt Cake
Pairing Butterfinger Bundt Cake with sides can elevate your dessert experience. Here are some great options:
-
Fresh Fruit Salad
A mix of seasonal fruits adds freshness and balances the sweetness of the cake. -
Chocolate-Covered Strawberries
These treats enhance the chocolatey flavor and make an elegant presentation alongside the cake. -
Creamy Vanilla Pudding
The smooth texture of vanilla pudding complements the dense cake beautifully. -
Honey Yogurt Parfait
Layered yogurt with honey and granola provides a delightful crunch and creaminess that contrasts well with the cake. -
Spiced Nuts
A bowl of spiced nuts offers a crunchy, savory element that pairs nicely with dessert. -
Coffee or Tea
A warm beverage can enhance the flavors of both the cake and any accompanying dishes, making it perfect for afternoon tea.
Common Mistakes to Avoid
Baking can be tricky, and even small mistakes can lead to disappointing results. Here are some common pitfalls to avoid when making Butterfinger Bundt Cake:
-
Incorrect oven temperature: Always preheat your oven to the right temperature. An oven that is too hot or too cold can affect the baking time and texture of your cake.
-
Not measuring ingredients accurately: Use proper measuring cups and spoons for accuracy. Too much or too little of an ingredient can drastically change the outcome.
-
Overmixing the batter: Mix until just combined to prevent a dense cake. Overmixing develops gluten, which makes the cake tough instead of light and fluffy.
-
Skipping the cooling time: Allow your cake to cool in the pan before transferring it to a wire rack. This helps prevent breakage and ensures a better texture.
-
Using old ingredients: Check expiration dates on baking powder, baking soda, and other ingredients. Fresh ingredients are key for achieving the best flavor and rise.
-
Forgetting to grease the pan: Properly grease and flour your bundt pan before pouring in the batter. This step is crucial for easy removal of the cake after baking.
Storage & Reheating Instructions
Refrigerator Storage
- Store leftover Butterfinger Bundt Cake in an airtight container.
- It will stay fresh for up to 5 days in the refrigerator.
Freezing Butterfinger Bundt Cake
- Wrap individual slices in plastic wrap, then place them in a freezer-safe bag.
- The cake can be frozen for up to 3 months without losing flavor or texture.
Reheating Butterfinger Bundt Cake
- Oven: Preheat your oven to 350°F (175°C), wrap slices in foil, and heat for about 10 minutes.
- Microwave: Place a slice on a microwave-safe plate, cover with a damp paper towel, and heat for 10-15 seconds.
- Stovetop: Use a skillet over low heat. Place a slice in the skillet, cover it with a lid, and warm it for about 5 minutes.
Frequently Asked Questions
What makes Butterfinger Bundt Cake special?
Butterfinger Bundt Cake combines rich flavors of butter, chocolate, and peanut butter with crunchy Butterfinger candy bits for an irresistible treat.
Can I use different candies instead of Butterfinger?
Absolutely! Feel free to substitute with other favorite candy bars or even nuts for added crunch and flavor.
How do I ensure my Bundt cake comes out clean?
Greasing and flouring your Bundt pan properly is key. Additionally, allowing the cake to cool slightly before removing helps maintain its shape.
Can I make this recipe ahead of time?
Yes! You can bake the Butterfinger Bundt Cake ahead of time and store it in the fridge or freezer until you’re ready to serve it.
Is there a way to make this recipe healthier?
You can substitute whole wheat flour or use less sugar, but keep in mind that this may change the texture slightly.
Final Thoughts
The Butterfinger Bundt Cake is not only delicious but also offers versatility for customization. Whether you prefer more candy pieces or want to experiment with different glazes, this recipe is sure to impress at any gathering. Give it a try—your taste buds will thank you!
Butterfinger Bundt Cake
Indulge in the delightful experience of Butterfinger Bundt Cake, a moist and rich dessert that combines the irresistible flavors of chocolate and peanut butter with crunchy bits of Butterfinger candy. Perfect for birthdays, gatherings, or when you’re simply craving something sweet, this cake is not just a treat; it’s a showstopper. The charming bundt shape, topped with a creamy peanut butter glaze and extra candy pieces, makes it an eye-catching centerpiece for any dessert table. With easy-to-follow instructions, even beginner bakers can create this delicious masterpiece that will have everyone asking for seconds.
- Prep Time: 20 minutes
- Cook Time: 55 minutes
- Total Time: 1 hour 15 minutes
- Yield: Serves approximately 12 slices 1x
- Category: Dessert
- Method: Baking
- Cuisine: American
Ingredients
- 3 cups all-purpose flour
- 2 cups granulated sugar
- 1 cup softened unsalted butter
- 1 cup sour cream
- 4 large eggs
- 1 cup whole milk
- 2 tsp vanilla extract
- 1 tsp baking powder
- 1 tsp baking soda
- 1 tsp salt
- 1 cup chopped Butterfinger candy bars
- 1 cup powdered sugar
- 3 tbsp creamy peanut butter
- 2–3 tbsp milk
- 1 tsp vanilla extract
Instructions
- Preheat your oven to 350°F (175°C) and grease a bundt pan.
- Cream together the softened butter and sugar until fluffy. Beat in eggs one at a time, followed by vanilla extract and sour cream.
- In another bowl, whisk flour, baking powder, baking soda, and salt. Gradually add dry ingredients to the wet mixture while alternating with milk until just combined.
- Gently fold in the chopped Butterfinger candy bars.
- Pour the batter into the prepared bundt pan and bake for 50-55 minutes or until a toothpick comes out clean.
- Allow cooling before drizzling with peanut butter glaze made from powdered sugar, peanut butter, milk, and vanilla.
Nutrition
- Serving Size: 1 serving
- Calories: 400
- Sugar: 38g
- Sodium: 300mg
- Fat: 20g
- Saturated Fat: 10g
- Unsaturated Fat: 10g
- Trans Fat: 0g
- Carbohydrates: 50g
- Fiber: 1g
- Protein: 5g
- Cholesterol: 70mg